The NetGear EX3700 extender is the best option for your WiFi device in a dead zone where the connection from the existing network is poor or non-existent. However, data traffic routed through the extender would be slower than traffic routed directly from the network.
The WiFi extender is designed to work like a bridge between a WiFi router (or a WiFi access point) and a WiFi device outside the range of the WiFi router. The extender connects to a working WiFi network where it functions as a network client, similar to how a WiFi device connects to a network. It will also act as an access point for WiFi devices by broadcasting its own WiFi network that WiFi devices can join.
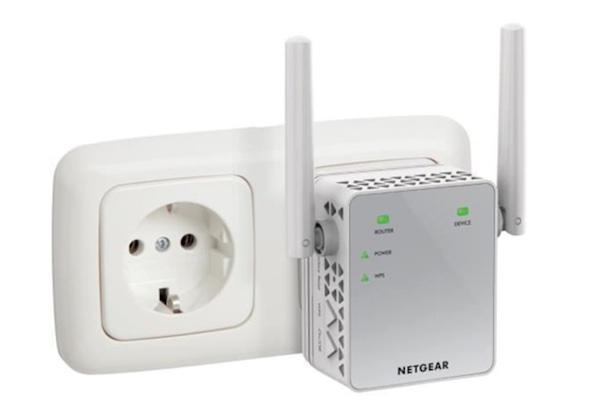
NetGear EX3700 Setup Guide
Install the WiFi Extender
Installing the WiFi extender happens in three steps; place the extender, apply power and connect it to your WiFi-network
Place the Extender and Apply Power
To place the extender and apply power
- Place the extender in the same room as your WiFi router. Ensure you place it as close as possible to the WiFi router. It only needs to be close enough during the setup process.
- Plug the extender into an electrical outlet
- Wait for the Power LED to light amber and then turn green. If this doesn’t happen, press the Power On/Off button on the side of the extender.
Connect to an Existing WiFi Network
To extend the range of your WiFi network, you must connect the extender to your existing WiFi network. You can do this in one of two ways;
Connect with WPS
- Wi-Fi Protected Setup (WPS) allows you join a secure WiFi network without typing the network name and password. Keep in mind that WPS does not support WEP network security. If you’re using WEP security, then you wouldl want to try connecting with Web Browser Setup.
- To use WPS to connect the extender to your WiFi router
- Press the WPS button on teh side panel of the extender. The WPS LED will blink.
- Wait for two minutes, press the WPS button on your router or access point. The WPS LED on the extender will light solid green, th Router Link LED will light up, and the extender should connect to your existing WiFi network. If the Router Link LED does not light, try again to see if it works.
- If your WiFi router supports the 5 GHz band, repeat all the steps above to connect the extender to 5GHz band
- Find the new extender network name on your computer or WiFi device. The extender will create two new extended WiFi networks. The extenders new WiFi network name will be the addition _EXT at the end of the name.
For example:
Existing WiFi network name. MyNetworkName
New extended network names. MYNetworkName_2GEXT and MyNetworkName_5GEXT
- Connect your computer or WiFi devices to the new extended WiFi network. Use the same WiFi password that you use for your WiFi router.
- Unplug the extender and take it to a new location that is closer to the area with a poor WiFi signal. Choose a location that is within the range of your existing WiFi router network.
- Plug the extender into an electrical outlet.
- Wait a while for the Power LED to light amber and then turn green. If the Power LED does not light, you will have to press the Power On/Off button on the side of the extender.
- Use the Router Link LED on the front panel to choose a spot where the extender-to-router connection is optimal.
Finding the Best Location
If the WiFi signal is weak, the first time you join the extender network, the Router Link LED or Device Link LED is amber or red. If this happens, you will have to adjust the extender;
- If the Router Link LED is amber or red, move the extender a bit closer to the router
- If the Device Link LED is amber or red, move the computer or WiFi device a bit closer to the extender.
Log In to the Extender After Installation
Once installed, you can log in to the extender to view or change the extender’s settings.
To log in to the extender
- Using a WiFi network manager on a computer or WiFi device, find and connect to the new extended WiFi network.
- Once the connection with the computer or WiFi device is established, the Device Link LED lights solid green.
- Launch a web browser.
- Enter www.mywifiext.net in the address field of the browser. A login screen will be displayed.
- Enter your email address and password and click the LOG IN button.
Run Smart Setup Installation
With your extender installed, you can use Smart Setup to change the extender settings. This makes it easier to connect the extender to a different router or to change the extender WiFi network name (SSID) or WiFi password.
View Connected Devices
Another function you would want to know more about is how to view connected devices. You can view a list of devices that are connected to the extender network.
To view connected devices:
- Go to your computer or WiFi device that is connected to the extender network, and launch a web browser.
- In the address field of your browser, enter www.mywifiext.net.
- When prompted, provide your email address and password.
- Click the Menu icon. The extender menu will be displayed.
- Select Settings > Connected Devices.
Change the WiFi Speed
WiFi speed through the extender network can be optimized to suit your browsing needs or usage.
To change the WiFi speed
- Go to your computer or WiFi device that is connected to the extender network, and launch a web browser.
- In the address field of your browser, enter www.mywifiext.net.
- When prompted, provide your email address and password.
- Click the Menu icon. The extender menu will be displayed.
- Select Settings > WiFi
- In the WiFi Speed menu, select a speed
- Click the SAVE button and your settings will be saved


